

Lightroom for Beginners 2025: Step-by-Step Guide & Tips
If you’re stepping into the world of photo editing and looking for a simple yet powerful tool, Adobe Lightroom is the perfect place to start. Whether you’re using Lightroom Classic, Lightroom CC, or Lightroom Mobile, this Lightroom for Beginners 2025 guide will walk you through everything — from importing photos to mastering presets, adjustments, and exports.
Let’s dive into how to use Lightroom for beginners in a step-by-step way so you can turn ordinary shots into professional-quality photos.
What Is Lightroom and Why Beginners Love It
Adobe Lightroom is a photo editing software designed for photographers, content creators, and hobbyists who want to enhance their photos efficiently. Unlike Photoshop, Lightroom focuses more on photo organization, color correction, and batch editing, making it ideal for beginners.
With the 2025 updates, Lightroom for beginners has become even easier to use, featuring new AI-powered tools, improved presets, and cloud syncing for seamless editing between devices.
Key features beginners love:
- User-friendly interface
- Non-destructive editing (original files remain untouched)
- Easy-to-use sliders for adjustments
- Access to Lightroom Mobile App for on-the-go editing
- Hundreds of free and paid Lightroom presets
If you’ve ever wondered whether to use Lightroom or Photoshop, think of it this way — Lightroom is for photo enhancement and workflow, while Photoshop is for detailed manipulation and design.
Step 1: Installing and Setting Up Lightroom
For Lightroom beginners, the first step is installation. You can download Adobe Lightroom CC through the Adobe Creative Cloud app, or use Lightroom Mobile on Android and iOS for free (with limited features).
Tip:
If you’re unsure which version to use, start with Lightroom CC — it’s cloud-based and easier for new users.
Once installed:
- Sign in with your Adobe ID.
- Choose your storage folder for photo imports.
- Familiarize yourself with the interface — the Library, Develop, and Export modules.
Step 2: Importing and Organizing Your Photos
One of the best features in Adobe Lightroom for beginners is its ability to organize photos efficiently.
To import your photos:
- Click on the Import button at the bottom-left corner.
- Select your photo folder or camera memory card.
- Use Collections or Folders to group images by event or project.
- Add keywords or metadata to help search images later.
This simple organization saves hours when you start working on multiple projects — one of the top Lightroom tips for beginners.
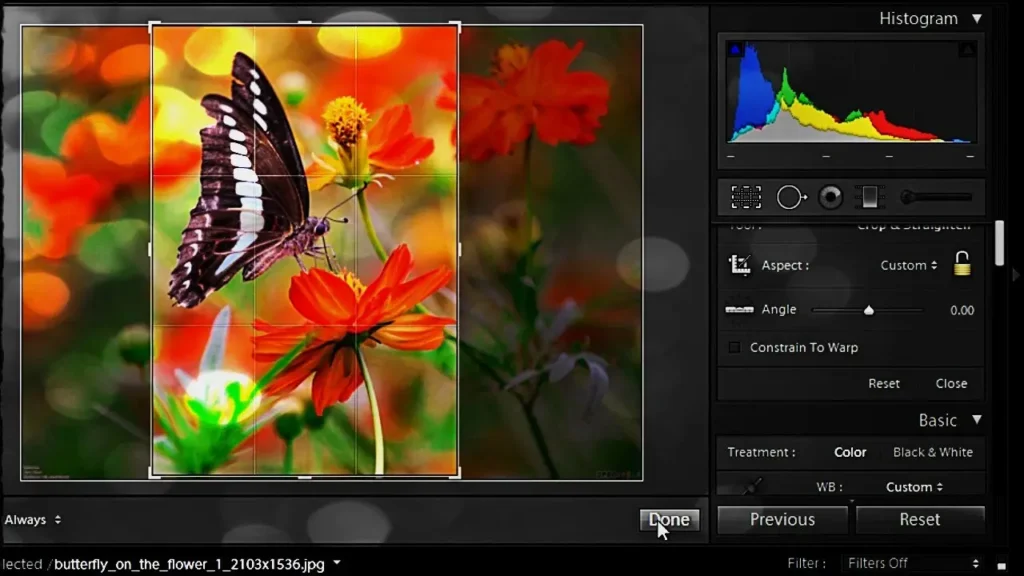
Step 3: Understanding the Lightroom Interface
For new users, the Lightroom workspace can seem overwhelming, but it’s designed logically.
Here’s a breakdown of the main panels:
- Library Module: Organize and preview images.
- Develop Module: Where all the editing happens.
- Map, Book, Slideshow, Print, and Web Modules: Optional for advanced workflows.
Lightroom Classic for beginners also features panels on the right-hand side that control exposure, color, tone, and effects.
Important Panels to Know:
- Histogram: Shows brightness and contrast.
- Basic Panel: Adjust exposure, highlights, shadows, and white balance.
- Tone Curve: Adds contrast and fine-tunes lighting.
- HSL/Color Panel: Perfect for adjusting specific color tones.
- Detail Panel: Used for sharpening and noise reduction.
Step 4: Basic Photo Editing in Lightroom (Step-by-Step)
Here’s how to edit in Lightroom for beginners:
1. Crop and Straighten
Start with the Crop Overlay tool. Adjust the framing to remove distractions or align horizons.
2. Adjust Exposure
Use the Exposure, Contrast, Highlights, and Shadows sliders to balance your lighting.
3. White Balance
Use the Temperature and Tint sliders to make your photo warmer or cooler.
4. Color Correction
The HSL/Color panel allows you to adjust Hue, Saturation, and Luminance for specific colors — great for correcting skin tones or enhancing skies.
5. Detail and Sharpness
Enhance clarity using the Clarity and Texture sliders, but don’t overdo them — subtle edits often look more professional.
6. Noise Reduction
If you’ve taken photos in low light, use the Noise Reduction slider to clean up grainy textures.
Step 5: Using Presets in Lightroom
Presets are one of the most exciting features for Lightroom beginners. They allow you to apply pre-made adjustments to your photos in a single click.
You can find free Lightroom presets for beginners online or within the Adobe ecosystem.
To use presets:
- In the Develop module, open the Presets panel.
- Click Import Preset and select your downloaded preset file.
- Apply it to your photo — you can still tweak the sliders afterward.
Some popular types include:
- Portrait presets
- Landscape presets
- Moody film presets
- Wedding presets
These save time and help you learn by observing how adjustments affect your photos.
Step 6: Exporting Photos from Lightroom
Once your edits are complete, it’s time to export your photos.
- Go to File > Export.
- Choose your destination folder.
- Set File Format (JPEG, PNG, TIFF).
- Adjust the Resolution (300 DPI for prints, 72 DPI for web).
- Click Export.
For Lightroom Classic beginners, this step is essential to get your final images ready for posting or printing.
Lightroom Mobile for Beginners
With Lightroom Mobile, editing on smartphones has never been easier.
You can use most of the same tools found in the desktop version, including:
- Selective Adjustments
- Healing Brush
- Presets
- AI Masking
- Color Mix
If you’re using Lightroom for beginners mobile free version, you’ll get access to the basics. Upgrading to Lightroom Premium unlocks features like masking and healing tools.
How to Edit on Lightroom Mobile:
- Import your photo using the “+” icon.
- Tap Light > Exposure/Contrast to adjust brightness.
- Use Color > Temperature to adjust tones.
- Apply Presets for quick edits.
- Export and share directly on Instagram or social media.
Lightroom vs Photoshop for Beginners
A common question on forums like Reddit and YouTube Lightroom for beginners tutorials is:
“Should I use Lightroom or Photoshop?”
Here’s a quick comparison:
| Feature | Lightroom | Photoshop |
| Ease of Use | ✅ Beginner-friendly | ❌ Steeper learning curve |
| Batch Editing | ✅ Yes | ❌ No |
| Organization | ✅ Excellent | ❌ Limited |
| Retouching Power | ⚪ Moderate | ✅ Advanced |
| Non-Destructive | ✅ Yes | ⚪ Partial |
If you’re just starting out, Lightroom is the best choice to learn photo editing fundamentals.
Learning Resources for Lightroom Beginners
If you want to expand your skills, here are great Lightroom courses for beginners and free resources:
- YouTube Lightroom for Beginners Tutorials 2025
- Channels like PHLEARN, Peter McKinnon, and Adobe Creative Cloud.
- Channels like PHLEARN, Peter McKinnon, and Adobe Creative Cloud.
- Lightroom for Beginners PDF Guides
- Free and downloadable step-by-step manuals.
- Free and downloadable step-by-step manuals.
- Lightroom for Beginners Books
- Titles like Adobe Lightroom Classroom in a Book and Lightroom 101 for Beginners.
- Titles like Adobe Lightroom Classroom in a Book and Lightroom 101 for Beginners.
- Lightroom for Beginners Reddit
- Join photography communities for tips, presets, and feedback.
Lightroom Tips for Beginners 2025
- Shoot in RAW: Gives you more editing flexibility.
- Use the Masking Tool: For selective exposure and color edits.
- Learn Shortcuts: Speeds up your workflow (e.g., “D” for Develop module).
- Avoid Overediting: Keep your photos natural.
- Experiment with Presets: Then tweak settings to suit your style.
- Back Up Your Catalog: Always protect your work.
- Study Light and Color Theory: It improves your editing decisions.
Common Beginner Mistakes to Avoid
- Overusing Clarity and Saturation (leads to unnatural results)
- Ignoring White Balance (can ruin skin tones)
- Not Using Lens Corrections (distorts photos)
- Forgetting to Crop or Straighten (affects composition)
- Editing JPEGs Instead of RAWs (limits flexibility)
Avoid these and you’ll see immediate improvement in your edits.
Final Thoughts
Learning Lightroom for beginners in 2025 is one of the best investments you can make in your photography journey. With its AI-driven tools, mobile flexibility, and intuitive interface, Lightroom makes professional editing achievable even for complete beginners.
Whether you’re using Lightroom Classic, Lightroom CC, or Lightroom Mobile, this step-by-step guide gives you everything you need to get started confidently.
So open Lightroom, import your first photo, and start creating magic — because every great photographer begins with a single edit.